General Masternodes
Introduction
This tutorial will guide you through the steps necessary to setup a ADON Masternode on a Linux Virtual Private Server (VPS) that is controlled via your local Control wallet.
Setting up a ADON masternode requires two separate core wallets:
- 1 core wallet containing the 100,000 ADON that are locked as collateral for operating the masternode.
- 1 core wallet running the masternode itself. It must be kept online 24/7 (see additional requirements below).
The collateral wallet can be kept offline and still receive masternode payments.
NOTE If you need any additional help, feel free to join ADON Discord and ask for a help in #support channel.
NOTE On Discord, DO NOT receive any help or assistance through private messages; there are many impersonators showing up as ADON team members that are trying to steal coins from you! They might look legit, but it’s high likely they are scammers. No one ever from ADON team will contact you privately and offer you help. Every help will be offered in public support channel!
Basic requirements:
-
Collateral Wallet:
- It can be any computer running the Adon core wallet. It will run the Control wallet and hold the masternode coins.
- The collateral wallet needs to hold 100,000 ADON
-
Masternode server:
- Remote VPS with an OS supporting Adon Core Wallet installed, with a fixed IP address and running 24/7
- Minimum VPS specs: 50 GB of storage space, 2 GB of RAM, 1 dedicated CPU core
- The latest Adon Core wallet release installed on the masternode
NOTE: You will need a different IP address for each masternode you plan to host.
Configuration of your Control wallet
Step 1 – Download ADON wallet
Download the most recent version of the Adon Core wallet here:
https://github.com/adonisexchange
Step 2 – Extract and install the wallet
Choose the proper version for your operating system. Extract it, install and run the wallet. After starting the wallet for the first time, it will offer you to make a default ADON data directory. Depending on your operating system, the default directory should be similar to:
C:\Users\YourUsername\AppData\Roaming\ADON
The above example of default directory is Windows based.
If you choose your own location ensure that you record where that is.
Step 3 – Create a Masternode using Creation Wizard
First of all, make sure that you have 100,000 ADON in your wallet.
-
Unlock the wallet.
-
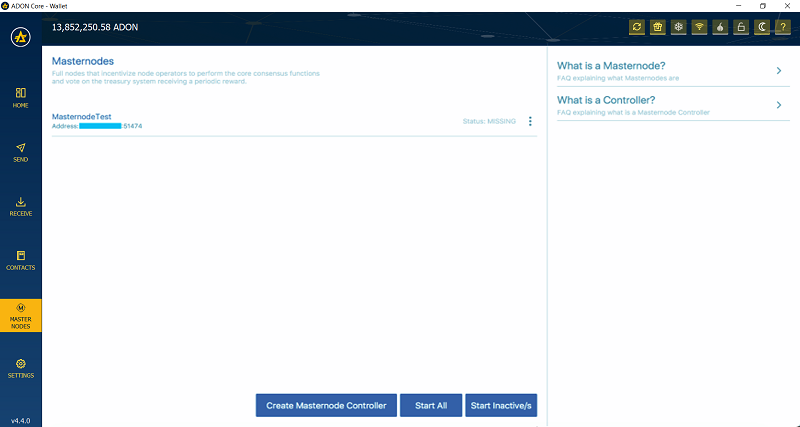
Go to “Masternodes” tab.
-
Click “Create Masternode Controller“.

-
Masternode Creation Wizard intro window will open. It just reminds you that you need to have 100,000 ADON in your wallet in order to create a Masternode. Just click the “Next” button.
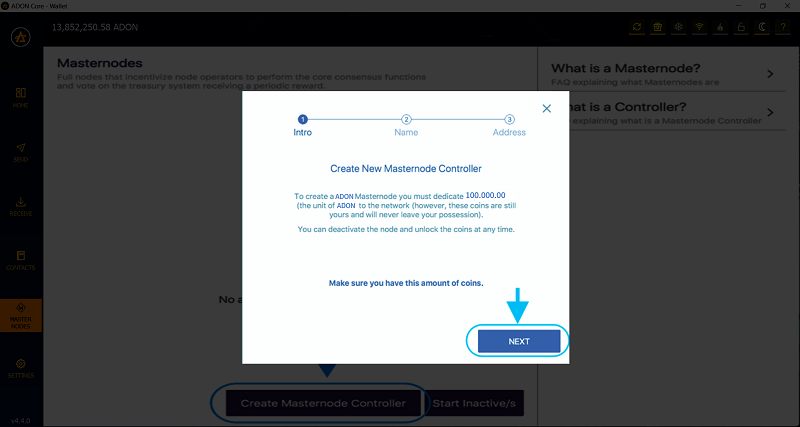
-
Now you need to type the Masternode name as per your wish (i.e. “Masternode01”) and then click “Next” button again.
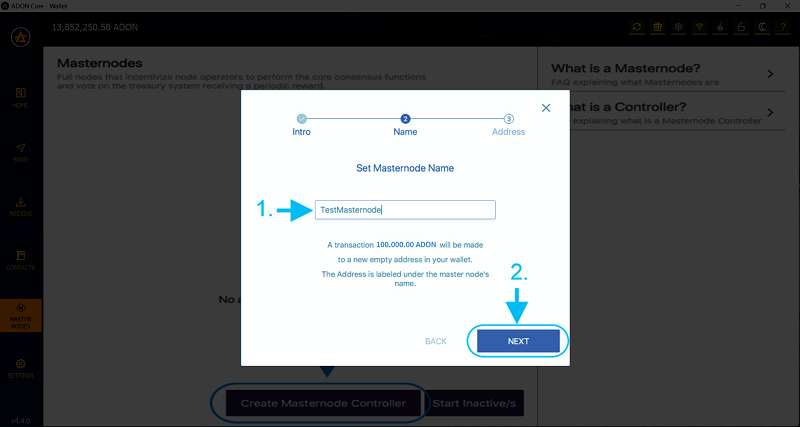
-
Now you will be asked to type the IP address of your VPS (it might look similar to “182.214.90.12”), and then click “Next” button again.
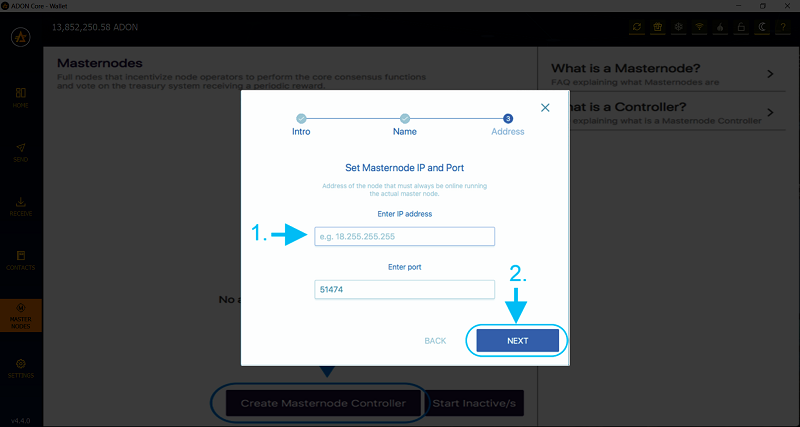
-
If everything went successful, you should get a message “Master node created!”.
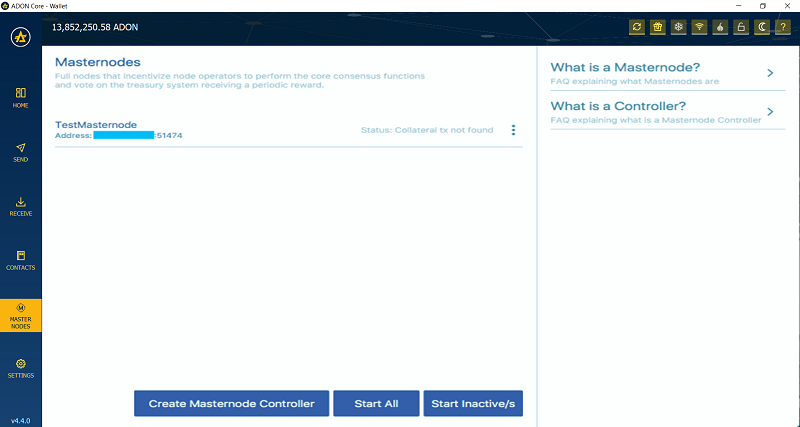
-
Status of the newly created Masternode will be “MISSING”. That is normal in this phase.
Step 3 bis - Create a Masternode from the Command line:
-
Download the latest ADON wallet release (Skip if you already have it installed)
cd ~ && wget https://github.com/adonisexchange -
Open your ADON wallet and let it sync (Skip if you already have it installed and synchronized)
cd ~ && cd ~/ADON-5.4.0/bin && ./ADON -daemon -
Generate a new ADON address and send exactly 100K ADON to it
./ADON-cli getnewaddressIf you are sending from within this wallet to the new address then run this command:
./ADON-cli sendtoaddress ADDRESSfromGETNEWADDRESS 10000 -
Get the masternode private key and masternode outputs, Save them to a text document for the upcoming steps:
./ADON-cli createmasternodekey
./ADON-cli getmasternodeoutputs
You can now close your ADON Control wallet by running the following command:
./ADON-cli stop -
We need to now add the information above to our "Masternode.conf file"
cd ~/.ADONOpen masternode.conf with your favorite text editor and add in the following:
{Name of Masternode} {VPS IP Address}:51472 {The result of createmasternodekey you saved in the text doc.} {Result of the getmasternodeoutputs} {The Single Digit Number after Masternode Ouputs}Sample Input:
mn1 127.0.0.2:51472 93HaYBVUCYjEMeeH1Y4sBGLALQZE1Yc1K64xiqgX37tGBDQL8Xg 2bcd3c84c84f87eaa86e4e56834c92927a07f9e18718810b92e0d0324456a67c 0
We will get back here to Control wallet little bit later after we setup VPS.
VPS Remote wallet installation
These procedures are for a clean server install. If you have an existing installation then some steps may not be required. Performing the steps is unlikely to have any effect on the system. Securing the server has NOT been included in this tutorial. That is your responsibility. Although it’s not required, a great guide can be found here to assist you.
To be able to access a VPS, you need a software/SSH client like PuTTY for example. You can choose between alternatives as well, but this tutorial will not include installation of such software. After you successfully login to your VPS, follow the further steps.
Step 1 – Install most recent security patches
A clean server install will likely need some software updates. Enter the following command which will bring the system up to date:
sudo apt-get update && sudo apt-get -y upgradeStep 2 – Download and extract Adon Core wallet for Linux
Enter the following command lines one by one to download and extract ADON wallet (Note these and later commands are for version 5.0.1. You should replace this with the latest version.):
cd ~ && wget https://github.com/adonisexchange

tar -zxvf ADON-5.4.0-x86_64-linux-gnu.tar.gz && sudo rm -f ADON-5.4.0-x86_64-linux-gnu.tar.gz
Masternode Configuration
Step 3 – Create the masternode configuration file and populate
Before the node can operate as a masternode a custom configuration file needs to be created. Since we have not loaded the wallet yet, we will create the necessary directories and the configuration file by typing the following command lines one by one:
mkdir ~/.ADON && cd ~/.ADON && sudo apt-get install nano && touch ADON.conf && nano ADON.confThis command has created a blank ADON configuration file where we will enter our masternode configuration variables. Now we should properly setup configuration settings.
Paste the following configuration settings into the editor (using PuTTY, paste is being done simply by right mouse click):
rpcuser=<YOUR_OWN_RPC_USERNAME>

rpcpassword=<YOUR_OWN_RPC_PASSWORD>

rpcallowip=127.0.0.1

server=1

daemon=1

maxconnections=256
Before you exit the editor, there are 3 parameters that you need to update with your own settings. These are:
- <YOUR_OWN_RPC_USERNAME> – Set this to a custom username. i.e. rpcuser
- <YOUR_OWN_RPC_PASSWORD> – Set this to a STRONG password. i.e. password<– NO!!! Use something more complex for your own safety!
- Now go back to Control wallet in Masternode tab, click on the 3 dots next to Masternode you created few steps above and then click “Info“.
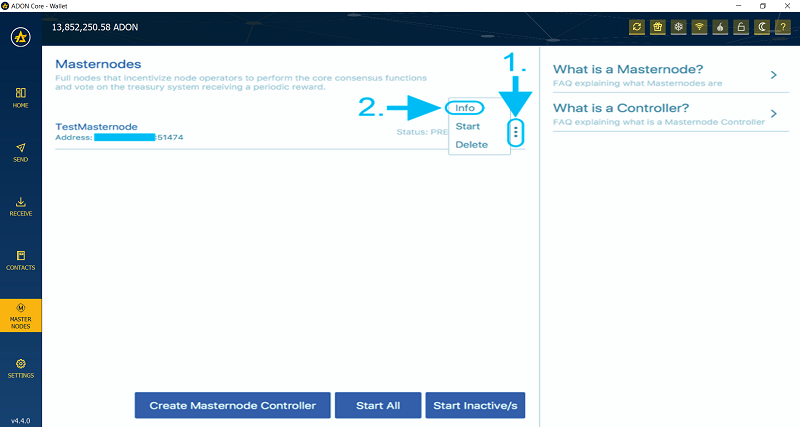
- Now go back to Control wallet in Masternode tab, click on the 3 dots next to Masternode you created few steps above and then click “Info“.
-
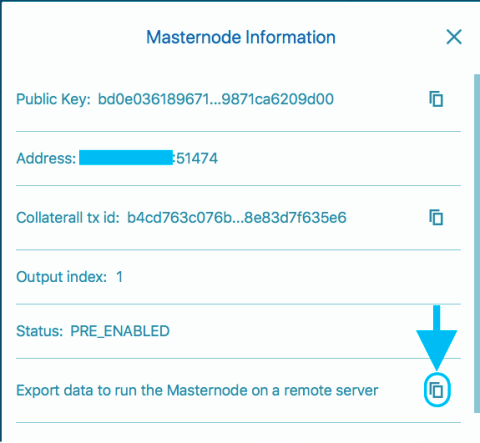
Now click icon next to “Export data to run the Masternode on a remote server“.
-
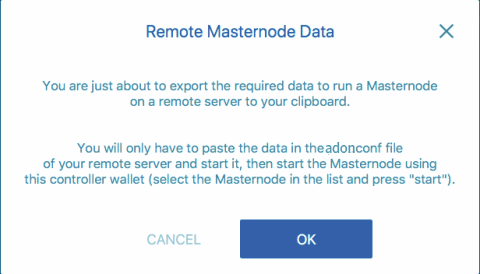
It will now ask you for a confirmation to export required data to run a Masternode. Click “OK” button.
-
Now you will get a message that required info was successfully exported (copied to your clipboard) and now you should paste it in your ADON.conf file on your VPS under themaxconnections=256 line in ADON.conf file.

-
After all, your ADON.conf file on your VPS should look like the following:
rpcuser=root
rpcpassword=PasswordOfYourChoice
rpcallowip=127.0.0.1
server=1
daemon=1
maxconnections=256
masternode=1
externalip=101.168.87.207
masternodeaddr=101.168.87.207:51472
masternodeprivkey=87haGjw6ABVZfZTcMNX5c1E3HUVH4qWcdc823RBDHsGC5P8FohW
Save and exit the editor by pressing CTRL-O and Enter to save and CTRL-X to exit the editor.
Start your Masternode
Step 4 – Load the masternode
With the configuration created we are now ready to load the masternode and sync to the network. Load the masternode by typing the following command:
cd ~ && cd ~/ADON-5.4.0/bin && ./ADONYou will get the message ADON server starting”. To follow the progress until the wallet is fully loaded and synchronized, type:
tail -f ~/.ADON/debug.logWait until you see the message similar to the following:
2020-01-10 13:31:01 CMasternodeSync::GetNextAsset – Sync has finished
2020-01-10 13:31:01 CActiveMasternode::ManageStatus() – not capable: Hot node, waiting for remote activation.
Once you get this message, you are completely synced and masternode is ready to be started. PressCTRL-C to get back to command line.
EXTRA STEP ONLY IF YOU DON’T SEE THESE 2 LINES/MESSAGES ANYWHERE:
./ADON-cli getbestblockhashYou will get back hash that will look like this:
1ab2a12a1a1a121a1212ab1aba121212121ab1a1a12a12121aba1a1abab1212aa1Paste the number you get after./ADON-cli reconsiderblockcommand like this:
./ADON-cli reconsiderblock 1ab2a12a1a1a121a1212ab1aba121212121ab1a1a12a12121aba1a1abab1212aa1Finally, type:
./ADON-cli clearbannedNOTE: Wait for 15 confirmations on the blockchain for transaction with the masternode collateral before proceeding with the next steps below.
Now go back to your Control wallet -> Masternodes -> Click “Start Inactive/s”
Status will change from MISSING -> PRE_ENABLED.

From the command line: If you have a password set on your wallet you will first need to unlock it (90 means it will be unlocked for 90 seconds):
./ADON-cli walletpassphrase YOURPASSWORD 90You can now proceed to start your masternode:
startmasternode missing yNow go back to your VPS and type:
./ADON-cli startmasternode local falseIf everything went well, you should receive the following message: “Masternode successfully started” Congratulations! You have successfully started your masternode!
ADDITIONAL NOTES:
-
If the output of getmasternodestatus is fine, then you are perfectly fine. But have in mind that it can take up to 2 hours for masternode to change status from PRE_ENABLED to ENABLED in the masternode list.
-
First masternode reward requires a longer waiting period. It usually takes 3-5 days to receive a first masternode reward.
-
You can close the Control wallet, as it is not needed. Only the VPS should be working 24/7.
If you have any troubles or issues, feel free to join ADON Discord and post your question in #support channel.
NOTE: Again, DO NOT ever receive any help or assistance through private messages, as there are many scammers out there trying to steal your coins, even if they look the same as developers, admins or support staff. Every help ever will be provided through public channels.
Shutting down a Masternode
1) How do I stop running masternode on my VPS and delete masternode from my Adon Control wallet?
a) In Control wallet in Masternode tab click on Masternode you wish to shutdown and click “Delete”.
b) Restart the wallet.
c) Your 100,000 coins are now unlocked and spendable.
2) How do I get the 100,000 ADON back that I’ve send to my Masternode address at the beginning?
You don’t need to “get it back” as it is already in your wallet. Being in the different address is not an issue as that’s also your address.
3) Can I use this 100,000 ADON normally on my wallet then again, and sell it or stake it normally like before?
Yes! If your wallet is unlocked for staking, it will automatically stake these 100,000 coins and you can spend them at any time.